
All about Image Stabilization
If you’re anything like me, one of the reasons you’ve upgraded gear over the years is to get sharper photos. It’s a never-ending quest, especially for those long shots, and Image Stabilization is one of the things that can really help you out — if you know how to use it. Unfortunately, quite a few people think stabilization is a magic sharpness pill that instantly makes all your shots sharper, but nothing could be further from the truth. In fact, IS is just another tool in your kit, and you’re responsible for using it wisely. Here’s what you need to know to get started.
What is stabilization?
When you see blur in your photos, it’s either because you’re not focusing on your subject, or it’s because your shutter speed wasn’t fast enough to stop the movement in your photo. One of the things beginners sometimes miss, though, is that movement in your subject isn’t the only thing that can cause a blurred photo — movement in your camera can do it, too. This is known as camera shake, and it’s impossible to avoid altogether if you’re hand-holding your camera.
The conventional rule of thumb to avoid camera shake was to use the inverse of the focal length of your lens (35mm equivalent) as the minimum shutter speed you’d use. For a 300mm lens, then, you’d need to keep your shutter speed faster than 1/300. Remember that the same 300mm lens on a crop-sensor body behaves like a 480mm lens, so your shutter speed needs to approach 1/500! This can be a real challenge under some lighting conditions, obviously, and it represented a big problem for telephoto shooters.
In 1994, Nikon introduced Vibration Reduction (VR) on one of its zoom lenses; Canon followed suit with its Image Stabilization (IS) system the next year. These days, most camera systems offer some form of stabilization, though not all systems work the same way. The goal of all these systems is to allow you to shoot at a slower shutter speed than the inverse rule would suggest without introducing camera shake to your shots.
Types of stabilization
The two main types of stabilization are in-lens stabilization, as introduced by Nikon and Canon, and in-body stabilization, where the sensor is actually shifted in response to vibration. Both techniques have distinct advantages and disadvantages.

In-lens systems use tiny actuators to shift lens elements inside the body of the lens to compensate for movement detected by the lens, resulting (hopefully) in a steady image falling on the sensor of the camera. These systems are generally considered to be slightly more effective than in-body stabilization because the IS system is specifically tailored to each lens. This also means that improvements are introduced one lens at a time — typically in a “generation-based” fashion (ie, first-generation IS, second-generation IS, and so on). Canon’s IS system, for example, was generally considered to be good for a stop or two of improvement when it was introduced, but more recent lenses are achieving up to four stops of improvement.
Camera systems that use in-body stabilization (ex: Sony, Pentax), on the other hand, move the sensor within the camera body. The biggest advantage of this system is that it applies to every lens you’ll ever mount on the camera — even old lenses. Similarly, if you ever upgrade your camera body, you’ll also upgrade the stabilization of all of your lenses — all at once.
There’s no clear advantage of either of these approaches, but they can be helpful to keep in mind if you’re still deciding on a platform.
How to use stabilization
If you shoot on “Auto” all the time, you can stop right here — leave IS turned on and don’t worry about it any more. I trust, though, that if you’ve read this far, you’re trying to get the most out of your equipment, so here are some tips that can help:
- Stabilization doesn’t do a thing to stop movement in your subject. If you’re seeing blur in a rapidly-moving subject, chances are IS won’t help you. Instead, so whatever you’ve got to do to get your shutter speed bumped back up where it belongs — open your aperture or increase your ISO. Maybe even look at throwing a little light on the subject.
- Turn IS off when you’re tripod-mounted. When you use IS while the camera is still, the system can actually introduce its own vibrations. The tiny movements of the lens elements or the sensor can set up a harmonic feedback when your kit is mounted on a tripod, and this movement will show up in your photos. Some lenses, in fact, actually make a noise when IS is operating — this noise represents tiny amounts of movement, and that’s not your friend when you’re looking for a sharp photo. While this isn’t universally true (some lenses are able to tell when they’re on a tripod), in general, you should leave IS off when your camera is on a tripod. Note that this assumes the tripod is stable and on solid ground — if you’re mounted to a car or a boat, or whatever, you’re obviously still moving, and you’d certainly want IS left on.
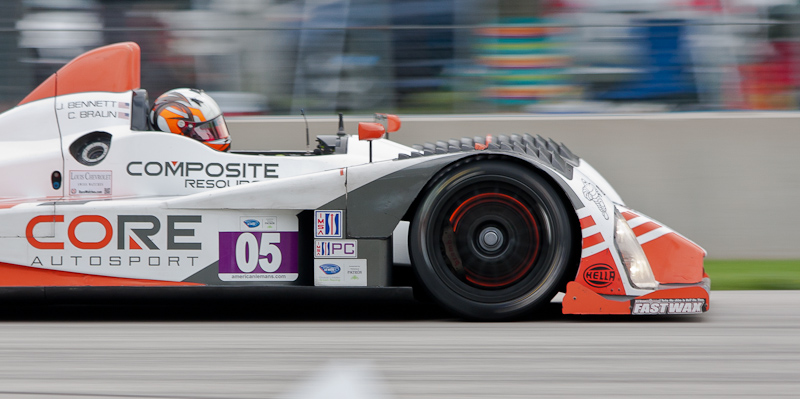
- Some IS systems have a panning mode. The race car above is tack-sharp at full size — even though the background is blurred from panning. In this case, I used the panning mode on my lens so that vertical vibration was damped, but horizontal vibration was ignored — this allowed me to follow the car with my viewfinder without the lens fighting that left-to-right movement. I’ve shot the same sort of scene with the lens in “normal” IS mode, and it makes a difference.
If this sounds like a lot of work, it is. I routinely leave IS in the wrong setting, and I’d love to see an interface improvement from Canon to make this easier to manage. In the meantime, though, this is one of those little details that will set your results apart from the masses when you get it right.
Related articles
- Vibration Reduction from Nikon (nikonusa.com)
- Exercise – Shutter speeds (robtownsendoca.wordpress.com)
Comments are closed.
2 Comments