Pixel Mago review, part 2
Back in July, I received a Pixel Mago flash unit for testing. Part 1 of this review covers my first impressions and initial testing, which were very positive. Since then, I’ve been using this Pixel unit as my main flash, and my impressions continue to be favorable. I also took a crack at doing some side-by-side testing against a couple other flashes — nothing as formal as I’d have liked, but interesting nonetheless. Read on for the details.
The Pixel Mago in the field
 Here are a few shots from the Marysville Balloon Festival in August, starting with a pretty standard fill-flash photo. Between the backlighting from the balloon and stage lights, the fill flash helped even the lighting a bit.
 Both of these were shot with the Pixel Mago set to e-TTL — this is almost always my preference with events and candids because the camera’s metering and the flash work together to adjust the intensity of the flash as ambient conditions change.[clear][spacer]
 A little later in the evening, someone started entertaining the kids with some bubbles, which turned out to be another great opportunity to use the flash. In this case, it not only helped illuminate all the people in the foreground of the shot, it also lit up the bubbles, which would have disappeared completely without the flash. Again, e-TTL helped by setting the flash’s power as well as its zoom. The Pixel’s zoom range, by the way, is better on both the wide and the telephoto ends than the Yongnuo YN-568EX I’d been using previously.
 Here’s a shot using both the Pixel and the the Yongnuo together. The Pixel is on-camera in this case, and the Yongnuo is on the stage at the left, pointed out toward the crowd.
 Finally, I’m sure the summer of 2014 will be remembered for the “ice water challenge” that swept social media, and this event wasn’t immune. This shot used both flashes again — a key to illuminating the scene, which was quite dark. The strobes also stopped the water as you can see here — even at 1/160 second, the duration of the flashes themselves was much shorter, providing the action-stopping effect seen here.[clear][spacer]
 All the examples above were shot in fairly dim lighting, but I also reach for a flash in brighter conditions when I see large dynamic ranges or shadows obscuring details I’d like to illuminate. Here, I’m shooting into a tent where Bobby Rahal is visiting his race team. Without the flash, I’d have lost a lot of details in the faces seen here, but just a little fill flash livens up the faces nicely.
 Here’s another fill-flash scenario — the bright lighting here would have shadowed everyone’s faces badly without some fill flash — especially with the ball caps worn by Patrick Dempsey and his team.
Below are a couple more fill flash shots — the Pixel Mago helps pick out detail in both of these shots that would be lost otherwise. If you’ve gotten the impression that I bring a flash with me every time I shoot, you’re right, and the Pixel Mago makes that especially easy with its great carrying case, which includes the belt look I’d been wishing for when I used the Yongnuo.
The Pixel Mago Compared to…
As I mentioned earlier, I did try to do a little bit of a comparison to a couple other flashes I’ve got at my disposal. In addition to the Pixel Mago, I tested the Yongnuo YN-568EX II, which has been my go-to flash for about a year and a half, and the LumoPro LP-160, which was the first external flash I bought for my Canon cameras. I was especially interested to see how the Pixel stacked up against the Yongnuo, because I considered the Yongnuo to be a breakthrough product in terms of price / performance. It was the first affordable alternative to Canon’s 580 / 600-series flashes that really had the features and power to go head-to-head with those top-of-the-line flashes. The LP-160, on the other hand, is a manual-only flash, but at the time I bought it, it was also a great value.
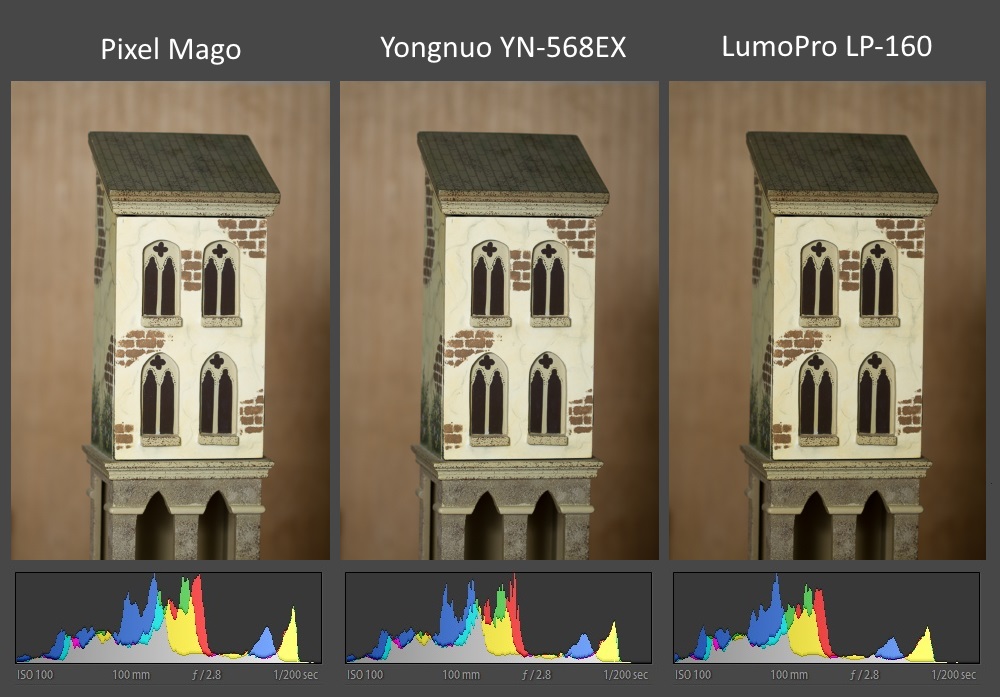
As I mentioned, I’d still like to be able to come up with a little more rigorous test setup for these flashes, but in lieu of that, this scene is a simple one-light setup, with the flash set to manual on full power and 24mm zoom (the widest that all three flashes have in common). The flash is used with an umbrella about 15 feet from the subject, and the room was darkened so the only illumination you see here is from the flashes.
 As you can see here, the outputs of the Pixel and Yongnuo are fairly comparable, with the LumoPro showing a little less output. This was frankly a little surprising to me, as I’d always considered the LumoPro to be a real horse in terms of power output. Lining up the
 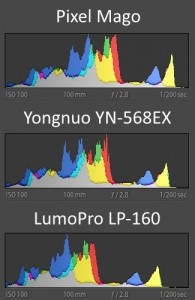 histograms vertically helps the comparison a bit, I think, and here we can see that the Pixel flash is actually doing noticeably better than the Yongnuo — very impressive. One test I’d still love to set up would be to match the Pixel and the Yongnuo, at least, at various zoom settings, because with it’s far greater 200mm reach, the Pixel should really pull away from the Yongnuo at long distances. Once again, it’s worth remembering that the Pixel actually retails at a substantial discount to the Yongnuo!
In addition to output, the recycle time of a flash is often quite important, so I tried to get a sense for how these flashes stacked up there, too. Again, the test wasn’t especially elegant, but the results were clear enough to be pretty convincing to me. Each flash was triggered with a YN-622C trigger — again, in Manual mode at full power. I triggered each flash four times, firing as soon as the “ready” light on the flash indicated that it was charged, and I timed the whole cycle from the first flash until the charge indicator lit back up for the last time. There’s obviously room in this test for some variation introduced due to my timing in firing the flashes and so on, but I’d expect no more than a second or so to be due to this. The results, though, weren’t even close: the Pixel Mago was fastest by far, at 13 seconds for the four-flash test, with the Yongnuo lagging at 21 seconds and the LumoPro further back at 27 seconds. I found it quite interesting to see how much the recharge time on the YN-568EX varied from shot-to-shot, as well — not actually an attribute you want to see in a flash.
In addition to this impressive showing, remember that the Pixel also has the ability to plug in an external charging pack, which should shorten its recharge time even further.
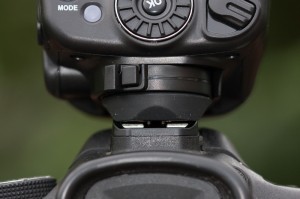 Incidentally, one of the features I mentioned in part 1 of this review was the mounting mechanism. The lever-action on the Pixel is a clear improvement over the rotary gear mechanisms on both the LumoPro and Yongnuo flashes. I was reminded of just how much nicer this is when I was swapping flashes in and out of test setups for these tests. The LumoPro, especially, shows the weakness of this design because as the flash ages, the gear to fasten the flash becomes more and more difficult to operate, to the point where it’s almost useless now on the LP-160. The lever action used on the Pixel, on the other hand, is easier to use from day 1, and looks like it will stand the test of time better, as well.
A couple quirks
Working with the Pixel Mago over the last few weeks, I’ve stumbled on the occasional gotcha. I’d chalk one or two of these up to learning curve items and one is most likely an interoperability issue. None of these are killer issues, and I don’t expect them to impact use of the flash on an ongoing basis.
 One of the features I didn’t have a chance to try out in time for part 1 of the review was the “multi” mode, which fires the strobe a number of times during one exposure. As you can see here, the effect is to create a sort of stop-action photo of a moving object where each burst from the flash freezes the object just a bit. I’m including this here in my “quirks” section mainly because this was more difficult than I’d expected to set up and get working correctly. I think part of the problem I experienced was that my Canon 7D actually has the ability to create this effect with any e-TTL-capable flash, and when I tried setting up the “multi” settings on the flash and used the e-TTL-capable YN-622C units, I’d typically see 2-4 shots with the flash doing what I expected and then it would revert to “manual” mode. The end result is that I wasn’t really sure from shot to shot whether the flash was going to do what I wanted it to do. When I set the camera up to mimic the same multi settings as I’d set on the flash, it seemed happier, but of course, this mitigates the value of having the setting on the flash in the first place. As near as I can tell, lower-end Canons don’t have this “multi” setting in their flash control menus, however, so it’s possible that this feature would be of greater value for someone with one of those cameras. If you try this, though, plan on spending some time putzing with the settings in order to get the effect you’re looking for. It’s a bit tedious.
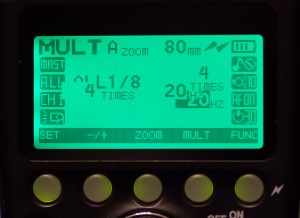 A couple of times while switching modes on the Pixel, I saw the LCD screen get just a bit confused as it tried to paint new menus over the top of old ones. This example shows the “multi” settings, but I’ve seen this occasionally with other modes, too. Usually, just switching modes again is enough to fix the screen, or worst case — turn the flash off and back on. Incidentally, this may be the sort of issue that Pixel can fix via updated firmware. If any such update becomes available, I’ll post an update here.
Next item: in the screen shot above, you can see “AF:ON” along the right side of the screen – this setting is to turn the AF assist beam on or off. This setting caught me by surprise a bit by comparison to the Yongnuo flash, since this is one of the things that the Yongnuo does very well. There’s no equivalent setting on the YN-568EX — the AF assist beam just comes on when it’s needed, as near as I can tell, whereas it’s a deliberate on/off control on the Pixel flash. Not a huge deal — especially now that I’m aware of it, and I can see where there might be occasional time when it might be nice to be able to turn the AF assist off so that the flash isn’t throwing out a red focus pattern for every shot.
Finally, I did notice some misses when working with multiple flashes and triggers, but I’m also not going to get too wound up about this because of the variety of bits I was trying to cobble together. I’ll definitely try to do more work with complex setups, though, and again, if I notice anything noteworthy, I’ll post an update here.
[row][span5]
The bottom line: A new champ!
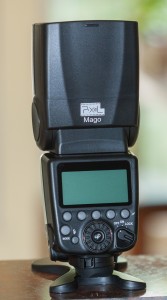 After working with this flash for a while, I’m really happy to say I’ve seen nothing at all to dampen my enthusiasm for the Pixel Mago
. The Pixel represents a new high-water mark for third-party flashes, in my opinion. Looking back at my old LumoPro, which was the best value on the market four years ago, and the YN-568EX, which was a quantum leap forward in functionality when it came out in 2013, the Pixel Mago beats both quite clearly in power, features, and incredibly, price.
If you own a Canon DSLR and you haven’t yet picked up an external flash, you’re running out of excuses. An external flash is one of the biggest difference-makers you can own, and the price of admission has just been slashed.
Once again, I’d like to offer my sincere thanks to the folks at Pixel for letting me test this flash. I’m really looking forward to seeing more winning products from them.
[/span5][span2][spacer]


7 Comments
excellent review!!!
Thanks, Connie.
Have you tested the Pixel Mago with the yn622 triggers in both ttl and manual mode. And how well do they work.
Yes, I’ve tried it with the YN622C, and my experience is the same as (I believe) other testers — TTL seems to work fine, but there’s no Manual control of the Mago via the YN622C’s. I’ll be watching for updated firmware from Pixel, and if anything changes in this respect, I’ll post an update.
Hi Sir, nice review, i am thinking to buy this flash but i have one small question .. What is the expected life of this flash ? i mean how much have you been shooting with this one in particular ? (a number, like 2000 3000 shots or something)
any new finds in regard to operability or lifespan issues?
I’m still using the Mago, as well as the newer X800C units. The Mago has suffered a twanged-off diffuser, and the zoom motor mechanism isn’t working, so I can’t say they’re 100% up-to-spec anymore. I still feel like these are pretty decent values for what you get, though.